You’ll have to travel about as far north as you can go in mainland Scotland to dive this tramp steamer, one of World War Two’s worst casualties through natural causes. JOHN LIDDIARD looks for the big picture. Illustration by MAX ELLIS
THE ASHBURY IS ONE OF THOSE WRECKS that just doesn’t show on an echo-sounder. The wreck is well broken among rocks, spread out and so close in that even on a flat-calm day the groundswell sloshes the boat up and down as it moves in as close as possible to drop divers off.
All you can really do is get in close to a cut in the western side of Dubh Sgeir Mhor and follow your nose.
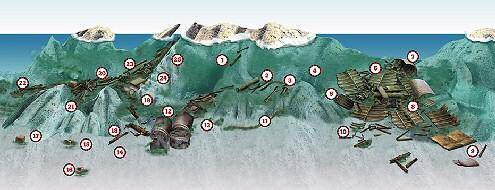
Under water, the cut in the rocks is not that pronounced, just a rounded valley in the rock face that slopes down past a few girders at 7m (1) to a section of mast on a ledge at 12-15m (2).
Turning south along the ledge, with uphill to the left and downhill to the right, the next big items of wreckage are the broken spindles of a cargo-winch with a length of chain draped across them (3).
The wreck then fizzles out to a kelp-covered slope that follows the rock round to the left, with dead men’s fingers, anemones and sponges beneath the overhangs (4). It would be easy to turn back and think that this was as far as it went.
Nevertheless, exploring further by continuing downslope to the south brings you to the forward section of the wreck, spread out across a wide sandy inlet between the rocks at 20m. The first recognisable items are a group of three winches close together among the splayed-open holds (5).
Following the broken line of the keel further east across the floor of the forward hold, the first sign of the bow is a pile of anchor-chain (6).
Next is the anchor-winch, resting upright on its mounting-plate, and then the hawse-pipes, separated from the bow but still crossed over one another.
Only the tip of the bow is still intact, resting on its port side (7) and rising about 3m above the seabed.
The bow section of the wreck is spread across a sandy inlet between the rocks. Following wreckage back along the southern edge of the inlet leads to an upturned winch, the fourth from the earlier group of winches, and a section of mast lying across the wreck (8).
Further out, general plates and ribs from the second hold eventually fizzle out on the sand (9). Turning north again, the edge of the wreckage can be followed back across the inlet to an anchor (10) resting on the sand just below the rocks. It just goes to show what a mixed-up wreck this is.
To get to the next main area of wreckage involves following the join between the sand and the rocks past a length of anchor-chain (11) to the boilers (12). Two of the three boilers lie up the slope of the reef, while the third lies below them, on end and well buried in the sand, so that less than a metre of the boiler sticks out.
Above the boilers, an area of debris from the engine-room is scattered up the slope back towards the ledge where our tour of the Ashbury began (13).
There are plenty of bits of pipe, valves and parts of an auxiliary engine mixed in among random shards of steel.
On the other side of the boilers, small scraps of wreckage continue north, just on the rocks and out on the sand. First are some obvious girders lying across a ridge in the rocks (14), then a box-section, part-buried in the sand (15).
I suspect there are many more bits of wreckage buried beneath the sand, though somewhat surprisingly a section of bearing from the propeller-shaft just sits in a slight indentation, almost floating on the sand about 10m out from the rocks (16). Wreckage along the edge of the rocks ends around the next corner with a larger box (17).
Heading back south, more of the engine and stern part of the wreck lies upslope from the sand.
A gully leads up the rocks with scattered girders (18), the trail of wreckage becoming denser and soon leading to the remains of the engine (19), resting in a shallow valley at 15m.

Two cylinders are intact and the third low-pressure cylinder is broken open.
Behind the engine, a bent section of propeller-shaft (20) leads off down the valley, ending among the spindles of a broken winch (21). Odd scraps of wreckage continue to the north, eventually fizzling out as the valley ends and opens out onto the sloping face of the rock (22).
Returning to the bent section of propeller-shaft and following it in the other direction, another section of shaft ends in the thrust-bearing (23) then, nearby, is the crankshaft from the engine (24) and, buried beneath the crankshaft, the spare propeller.
A tight mass of wreckage continues along the floor of the valley as it turns up towards the shallows, narrowing and steepening to a tight canyon (25). While it would be possible to end the dive and surface here, it makes more sense to skirt back along the face of the rock and surface closer to the entry-point, where a boat will have fewer problems picking divers up.
So, having finished the tour, let’s get back to the big picture. The Ashbury was a big ship at 3,900 tons and 104m long. It obviously broke its back just forward of the boilers, the forward part with two holds pushing along and past the rocks.
The aft part was then dashed to pieces against the northern end of the rocks, the boilers falling out and down the slope, and the engine and at least part of the propeller-shaft coming to rest in the valley halfway up the rocks.
There were four winches between the forward holds, which leads me to think that there would have been a similar number between the aft holds, but my sketch shows only one of them. The propeller-shaft points to the north, but wreckage soon fizzles out.
That means that there is a chunk of wreck missing from my sketch, possibly as much as the entire aft hold and the stern.
I explored well to the north of what the illustration shows and also searched further out onto the sand, but without success. Perhaps the remains of the stern are buried further out on the sand.
The section of bearing (16) would support this theory. Another possibility is that the stern was broken from the wreck sufficiently intact to be pushed over the reef and out the other side, lying somewhere behind the rocks from the point of view of the illustration.
AT THE MERCY OF THE WINDS
The Ashbury had condenser trouble, to put it mildly. That and the ferocity of the storm of 8 January, 1945, drove her on to the reef called Dubh Sgeir Mhor, which translates from the Gaelic as Big Black Rock. It lies at the mouth of Talmine Bay, almost as far north as you can go in the north-west of Scotland, writes Kendall McDonald.
When this tramp steamer went down, all 42 onboard were drowned, making this one of the worst WW2 shipping losses not caused by enemy action.
She was launched at West Hartlepool in 1924 as the Nitedal. A year later she was the Cairnhill. In 1935 she was bought by “the flying bug line”, the Alexander Shipping Line, which used a busy bee on its blue house flag. It renamed the vessel Ashbury.
By the end of 1943 she was still untouched, but in late ’44 she was in the Med when her condenser started playing up. In Spain 240 of its 992 tubes were plugged, but it wasn’t a cure, and her engineers had to use sawdust to stop the leaks.
Back in Workington, the condenser was still giving trouble, but as the next port of call was the Tyne, it was decided to do the repairs there. The fact that this meant taking a ship with a dodgy condenser round Scotland through the wild seas of January doesn’t seem to have worried anybody.
The Ashbury sailed in ballast with 345 extra tons of stone rubbish. This kept her propeller boss under water but left the blades breaking the surface. She still reached her convoy rendezvous in Loch Ewe on time, but while waiting for sailing orders lost her starboard anchor when the cable snapped.
Neither cable nor anchor were replaced before she sailed with the convoy on 6 January, 1945 – straight into a force nine gale with snow from the north. Captain David Morris soon dropped far behind. Lack of proper ballast made the ship unmanageable and he dropped her port-bow anchor and radioed for help. By midnight, Ashbury was adrift.
Ste Therese of the Canadian Navy fought for two hours to get a line aboard before losing contact. At first light 26 bodies were found washed ashore at Talmine and at Tongue, and from the shore two masts could be seen standing up amid huge seas.
Years later, members of Thurso BSAC were the first to see the wreck when they found a bronze prop and 4in gun on the shore side of the reef – giving some idea of how strong those winds had been.
TOUR GUIDE
GETTING THERE: On the Ordnance Survey map, follow the A836 west from Thurso then, before Tongue, turn right on unclassified roads to Skerray.
DIVING : The nearest charter-boats are based in Scapa Flow. Otherwise, it’s best to take your own RIB.
ACCOMMODATION: Camping and hotels in the Thurso area, about 90 minutes’ drive from Skerray, or Kyles of Tongue further to the west.
TIDES: The Ashbury can be dived at any state of the tide.
HOW TO FIND IT: The GPS co-ordinates are 58 32.822N, 4 24.659W (degrees, minutes and decimals). Nothing will show on an echo-sounder, so just descend the western side of Dubh Sgeir Mhor and explore the area shown in the illustration.
LAUNCHING : The most convenient slip is in the harbour at Skerray.
QUALIFICATIONS: Suitable for anyone.
FURTHER INFORMATION: Admiralty Chart 1954, Cape Wrath To Pentland Firth. Ordnance Survey Map 10, Strathnaver. Ordnance Survey Map 11, Thurso & Dunbeath. Caithness Wreck Diving. Shipwreck Index Of The British Isles Vol 4 by Richard & Bridget Larn. Caithness Community Website.
PROS: So out of the way it is rarely dived.
CONS: So out of the way it is rarely dived.
Thanks to Davy Carter, Mark Liddiard, Ian Mackay, Tony Jay, Victoria Jay, Tim Walsh & Rachel Locklin.
Appeared in Diver, August 2004